注解
1、Annotation 架构
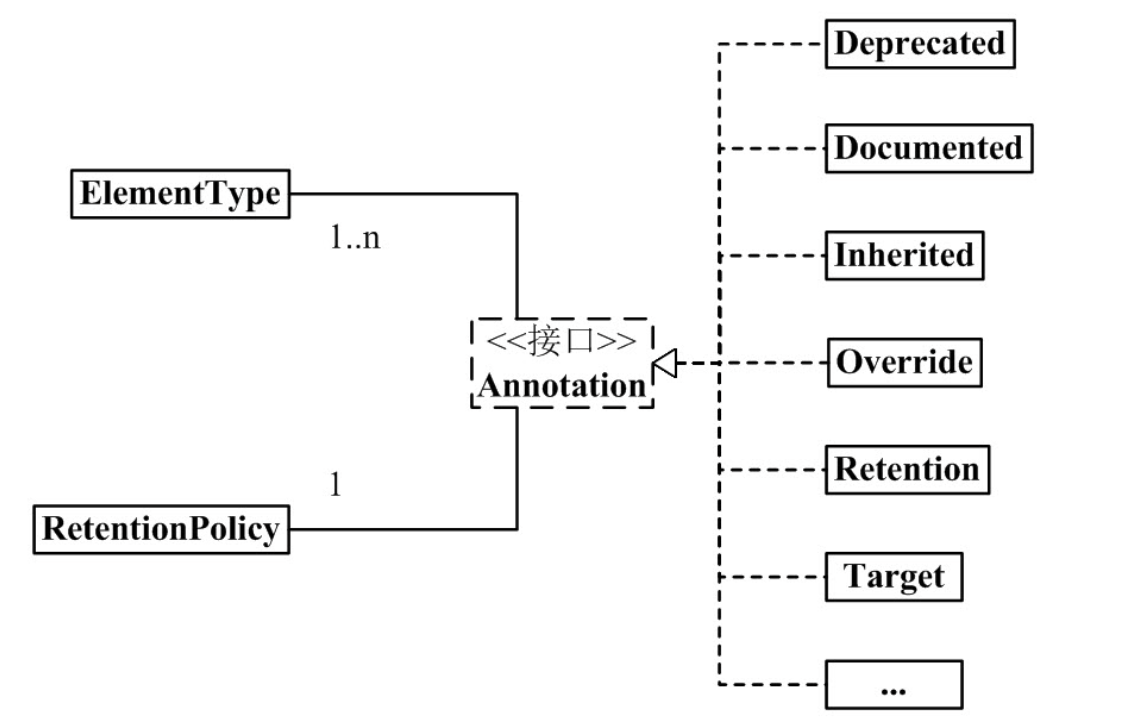
2、Annotation 组成部分
java Annotation 的组成中,有 3 个非常重要的主干类。它们分别是:
Annotation.java
package java.lang.annotation;
public interface Annotation {

    boolean equals(Object obj);

    int hashCode();

    String toString();

    Class<? extends Annotation> annotationType();
}ElementType.java
package java.lang.annotation;
public enum ElementType {
TYPE, /* 类、接口(包括注释类型)或枚举声明 */
FIELD, /* 字段声明(包括枚举常量) */
METHOD, /* 方法声明 */
PARAMETER, /* 参数声明 */
CONSTRUCTOR, /* 构造方法声明 */
LOCAL_VARIABLE, /* 局部变量声明 */
ANNOTATION_TYPE, /* 注释类型声明 */
PACKAGE /* 包声明 */
}RetentionPolicy.java
package java.lang.annotation;
public enum RetentionPolicy {
SOURCE, /* Annotation信息仅存在于编译器处理期间,编译器处理完之后就没有该Annotation信息了 */
CLASS, /* 编译器将Annotation存储于类对应的.class文件中。默认行为 */
RUNTIME /* 编译器将Annotation存储于class文件中,并且可由JVM读入 */
}3、自定义注解
当我们理解了内置注解, 元注解和获取注解的反射接口后,我们便可以开始自定义注解了。
创建自定义注解和创建一个接口相似,但是注解的interface关键字需要以@符号开头,我们可以为注解声明方法。
自定义注解格式:
// 元注解
public @interface 注解名称{
    // 属性列表
}
我们先来看看注解的例子:
3.1、创建自定义注解
/**
 * 自定义注解例子
 */
@Documented
@Retention(RetentionPolicy.RUNTIME)
@Target(ElementType.METHOD)
@Inherited
public @interface HelloAnnotation {
    String value();
}
3.2、使用自定义注解
/**
 * 使用自定义注解
 */
public class HelloAnnotationClient {
    @HelloAnnotation(value="Simple custom Annotation example")
    public void sayHello(){
        System.out.println("Inside sayHello method..");
    }
}
3.3、测试自定义注解
/**
 * 自定义注解测试
 */
public class HelloAnnotationTest {
    public static void main(String[] args) throws Exception {
        HelloAnnotationClient helloAnnotationClient=new HelloAnnotationClient();
        Method method=helloAnnotationClient.getClass().getMethod("sayHello");
        if(method.isAnnotationPresent(HelloAnnotation.class)){
            HelloAnnotation helloAnnotation=method.getAnnotation(HelloAnnotation.class);
            //Get value of custom annotation
            System.out.println("Value : "+helloAnnotation.value());
            //Invoke sayHello method
            method.invoke(helloAnnotationClient); }
    }
}
4、注解是如何实现的
4.1、疑问的起点
以前在写代码的时候就看过一些注解的源码,每次点进去看的时候发现都只有简简单单几行代码,但是为什么就可以实现一些非常复杂的功能呢?哪个时候还不太在意,今天在写代码的时候,看到了@Slf4j的注解,突然想看看它的源码是什么,然后点进去一看
//
// Source code recreated from a .class file by IntelliJ IDEA
// (powered by FernFlower decompiler)
//

package lombok.extern.slf4j;

import java.lang.annotation.ElementType;
import java.lang.annotation.Retention;
import java.lang.annotation.RetentionPolicy;
import java.lang.annotation.Target;

@Retention(RetentionPolicy.SOURCE)
@Target({ElementType.TYPE})
public @interface Slf4j {
    String topic() default "";
}
这就是所有的代码,还是一如既往的简单,再去看了其他的注解依然如此,那么究竟靠什么来实现对应的功能呢?
4.2、注解如何起作用
4.2.1、注解与接口
注解实际上就是一个标签,我们在一个某一类事物打标签的时候也是尽量越简单越好,所以注解就是这么回事,它仅仅是一个标签,其代码结构如下:
public @interface 注解名称{
    属性列表
;
}
仅仅是注解名字加上注解的一些属性,然后我们又注意到,它的定义方式是@interface
interface我们都知道,是一个接口,那么猜测注解的本质上类似接口,所以注解才会如此简单,因为接口也是如此仅仅定义方法而不去实现,想到这一层之后脑子里突然明朗起来。
4.2.2、注解与反射
为什么都说注解实际上就是使用反射实现的,我们已经看过了注解里面的东西,就这么一点,与反射有什么关系呢?但是大家都说注解就是用反射实现的自然有其的道理。
如果自己使用过一些反射代码,就会留意到有这么一个方法:
xxx.getAnnotation(annotation.class)xxx代表着一个对象,annotation.class代表一个注解的class,我们可以通过这个方法来获取一个类上相应的注解。
还可以直接判断一个对象上是否使用了某某注解:
xxx.isAnnotationPresent(annotation.class)至此我们应该已经想到了一个注解对应的功能是如何实现的了。
当我们注明一个注解的时候,只是制造出了一个标签
当我们给一个类加上注解的时候,就是给这个对象贴上了某个标签
然后实现一个方法:通过反射得到一个对象,然后判断对象上是否有此注解,如果有再进行相应的操作,通过反射我们可以得到这个对象的所有信息,所以想要进行什么操作也是可以的。
这就是注解从定义到起作用的一个过程,举个第三步的例子:
当我们给一个方法加上了一个注解
public class TestAnnotation {
    public static void main(String[] args) {

        XXX类 对象= new XXX();

        Class clazz = 对象.getClass();

        Method[] method = clazz.getDeclaredMethods();

        for ( Method m: method ) {
            if ( m.isAnnotationPresent( annotation.class )) {
               如果方法有此注解,我们就可以进行想要进行的操作
               ...........
        }
    }
}
当然要完成真正注解的作用还是很复杂的,主要用到反射,包注解扫描,aop相关的知识共同完成的
4.3、注解三板斧
定义、使用、读取
定义:包括名字,能用到哪些地方,有效期,是否可以被继承
使用:定义好之后在允许的地方使用标注即可
光有前两步,没什么用,如最熟悉的@Override注解,为什么能验证重写是否有效,怎么不是验证重载?spring的@Autowired为什么是注入作用,而不是输出一句话?显然,他们在程序中做了实现,使得其注解具有各自的作用,也具有了意义,而赋予灵魂的一步就是读取
读取:让注解发挥作用,给注解注入灵魂
4.3.1、举个例子
自己自定义个注解,并赋予它作用,模拟aop功能,在方法前后加入自定义逻辑
定义注解
//方法前执行
 @Retention(RetentionPolicy.RUNTIME)
 @Target(ElementType.METHOD)
 public @interface MyBefore {}
 //主要方法
 @Retention(RetentionPolicy.RUNTIME)
 @Target(ElementType.METHOD)
 public @interface MyCore {}
 //方法后执行
 @Retention(RetentionPolicy.RUNTIME)
 @Target(ElementType.METHOD)
 public @interface MyAfter {}
使用注解
public class Test {
     @MyBefore
     public void init() {
         System.out.println("初始化。。。");
     }
     @MyAfter
     public void destroy() {
         System.out.println("销毁。。。");
     }
     @MyCore
     public void core() {
         System.out.println("核心方法");
     }
 }
赋予注解作用
前两步简单,重要的是如何赋予注解作用
public class MyWork {
    public static void main(String[] args) throws Exception{
        //获得测试类
        Class clazz = Test.class;
        //获得一个实例
        Object obj = clazz.newInstance();
        //获得Test的所有public方法,将他们存入对应的集合中
        List<Method> myBeforeList = new ArrayList<>();
        List<Method> myAfterList = new ArrayList<>();
        List<Method> myTestList = new ArrayList<>();
        Method[] methods = clazz.getMethods();
        for (Method method : methods) {
            if (method.isAnnotationPresent(MyBefore.class)) {
                myBeforeList.add(method);
                continue;
            }
            if (method.isAnnotationPresent(MyCore.class)) {
                myTestList.add(method);
                continue;
            }
            if (method.isAnnotationPresent(MyAfter.class)) {
                myAfterList.add(method);
                continue;
            }
        }
        //调用标有MyTest注解的方法
        for (Method test : myTestList) {
            //在测试方法前先执行标有MyBefore注解的方法
            for (Method method : myBeforeList) {
                method.invoke(obj);
            }
            //调用test方法
            test.invoke(obj);
            //在测试方法后执行标有MyAfter注解的方法
            for (Method method : myAfterList) {
                method.invoke(obj);
            }
        }
    }
}
输出
初始化。。。
核心方法
销毁。。。
这只是个举个例子,真实的应用场景绝对不会这么简单
我们尝试按此三板斧套路分析下@Autowired是如何工作的
4.3.2、源码分析
定义注解
@Target({ElementType.CONSTRUCTOR, ElementType.METHOD, ElementType.PARAMETER, ElementType.FIELD, ElementType.ANNOTATION_TYPE})
@Retention(RetentionPolicy.RUNTIME)
@Documented
public @interface Autowired {
   /**
    * Declares whether the annotated dependency is required.
    * <p>Defaults to {@code true}.
    */
   boolean required() default true;

}
源码看起来不难,规定了有效期在运行期间,并且可以标注在构造器、方法、参数、常量、注解上面,并且定义了一个属性required默认值为true
使用注解
@RestController
public class Test {
@Autowired
private User user;
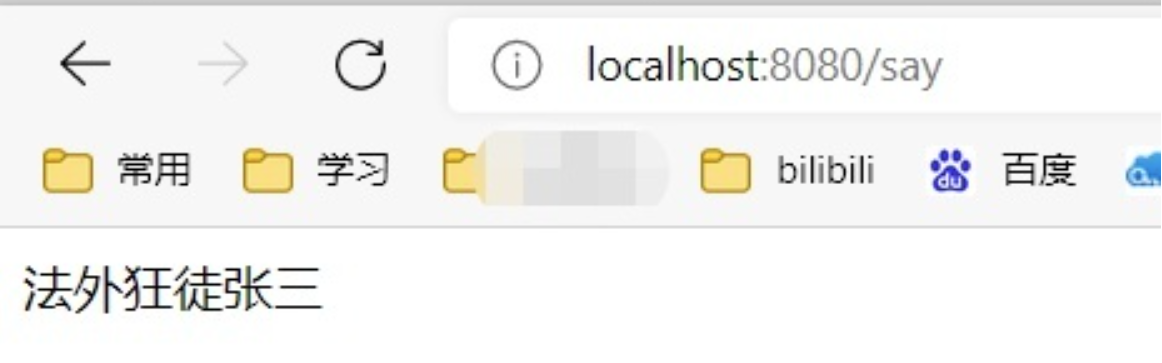
@RequestMapping("/say")
String sayHello() {
user.setName("法外狂徒张三");
return user.getName();
}
}这里主要是为了体现spring给我们创建了一个对象,所有不会抛空指针,页面有值
那么spring是如何做到的呢?正所谓注解两板斧不难,重要的是第三板斧
读取注解
@Autowired注解由AutowiredAnnotationBeanPostProcessor这个后置器类进行处理
先获取标注了@Autowired注解的属性或方法并存入一个集合中,通过反射的方式注入进去
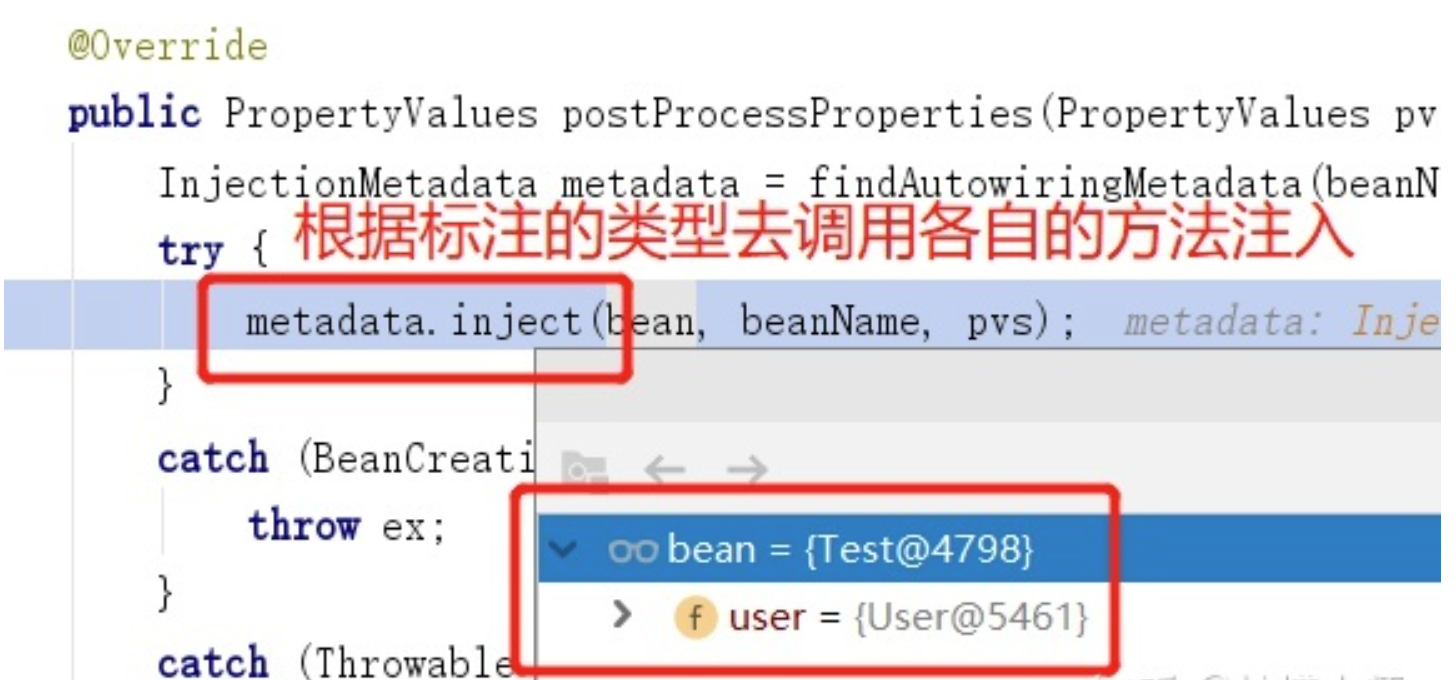
注入的方法是该后置器的postProcessProperties方法的inject方法
这两种方法同样在后置器类中对InjectionMetadata进行了重写
public void inject(Object target, @Nullable String beanName, @Nullable PropertyValues pvs) throws Throwable {
Collection<InjectedElement> checkedElements = this.checkedElements;
Collection<InjectedElement> elementsToIterate =
(checkedElements != null ? checkedElements : this.injectedElements);
if (!elementsToIterate.isEmpty()) {
for (InjectedElement element : elementsToIterate) {
//核心由于AutowiredAnnotationBeanPostProcessor重写了inject,所以会根据传入的元素类型来调用不同的方法,注入属性或者调用方法
element.inject(target, beanName, pvs);
}
}
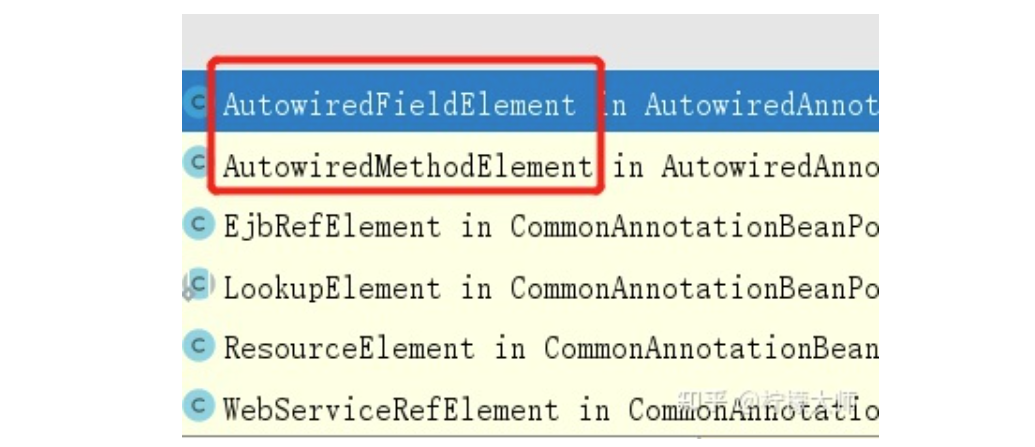
}如果标注的是属性那么调用AutowiredFieldElement方法
这里表明会给我的user属性附上一个user对象
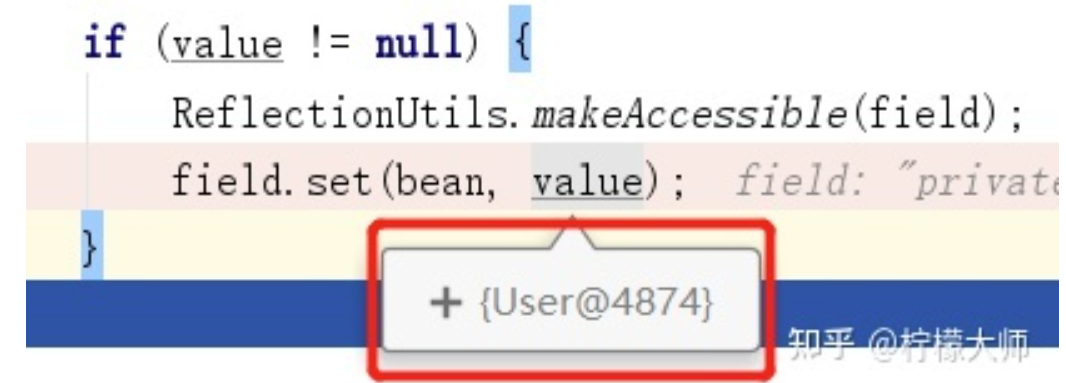
如果标注的是方法那么调用AutowiredMethodElement方法
if (arguments != null) {
   try {
      //执行标注了@Autowired的方法
      ReflectionUtils.makeAccessible(method);
      method.invoke(bean, arguments);
   }
}
这些就是@Autowired注解的读取
源码拓展
如果深入了解下@Autowired可以看下去
整个过程的调用情况如下,其中postProcessPropertyValues已弃用,取而代之的是postProcessProperties
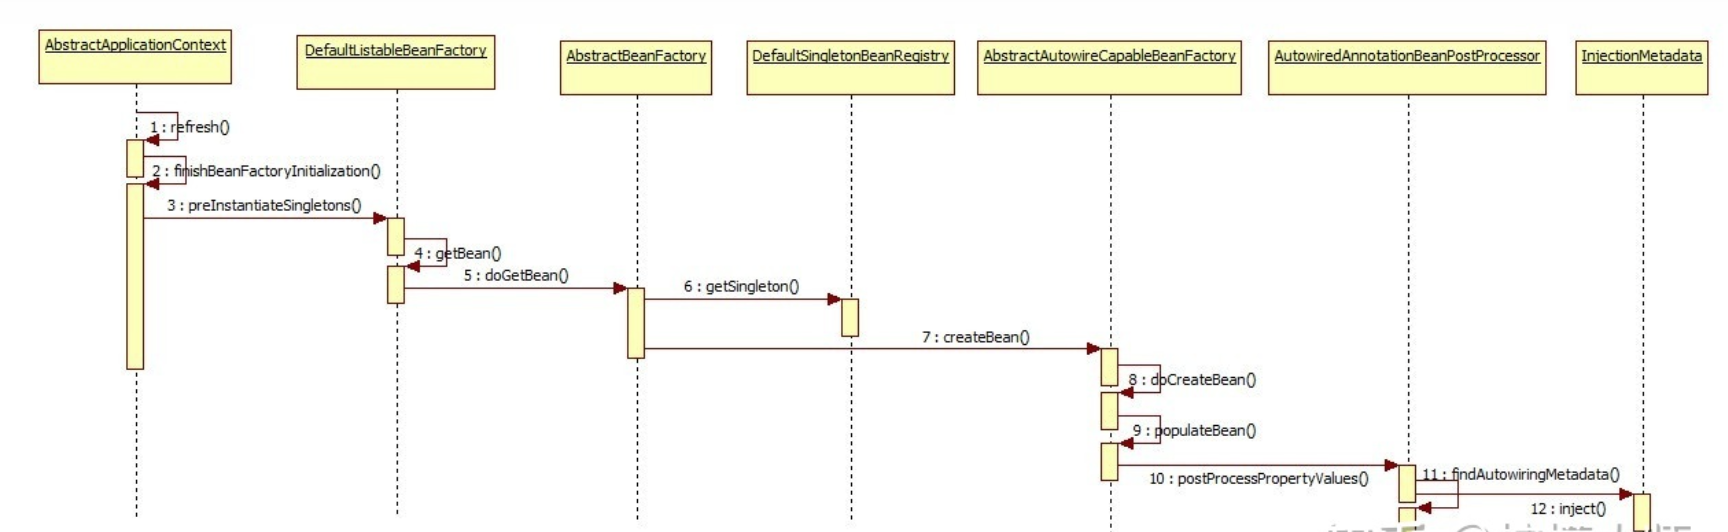
整个过程的源码调用非常的多,建议自己动手debug,不然会蒙圈,源码光看是看不会的
疑问一:如何具备匹配Autowired的能力?
在创建出AutowiredAnnotationBeanPostProcessor后置类的时候进行了初始化,将Autowired这个注解类型放入了集合中,方便后面匹配使用,那么如何进行该后置器类的初始化?
public AutowiredAnnotationBeanPostProcessor() {
this.autowiredAnnotationTypes.add(Autowired.class);
this.autowiredAnnotationTypes.add(Value.class);
//省略
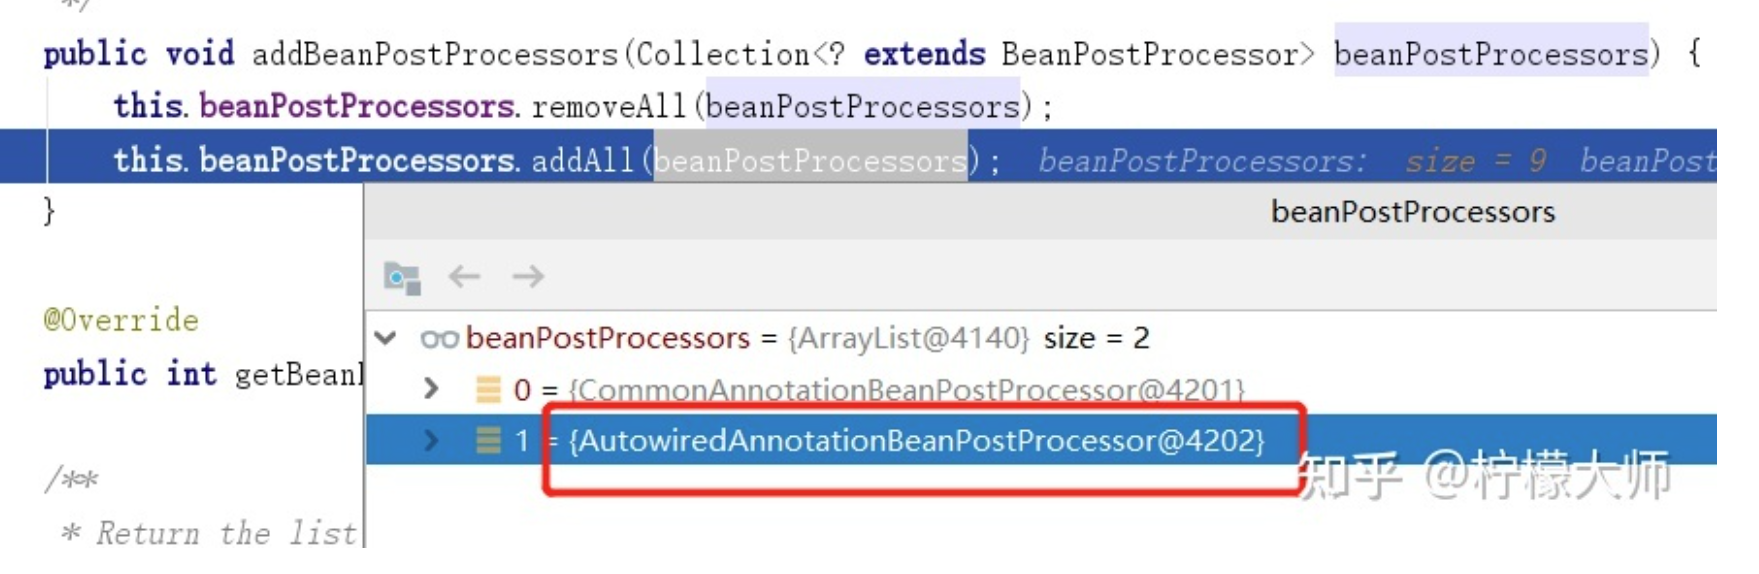
}疑问二:那么如何进行AutowiredAnnotationBeanPostProcessor后置器类的初始化?
在spring容器启动的时候会调用关键的refresh方法,其中有一步就是去注册所有的后置器类,自然也包括AutowiredAnnotationBeanPostProcessor这个类
疑问三:AutowiredAnnotationBeanPostProcessor激活之后如何去获取到注解标注的属性或方法
如图第11步,该后置器类有一个findAutowiringMetadata方法,找到的话最后返回一个InjectionMetadata集合,后面利用这个集合中的元素来进行注入
private InjectionMetadata findAutowiringMetadata(String beanName, Class<?> clazz, @Nullable PropertyValues pvs) {
	//省略
    if (InjectionMetadata.needsRefresh(metadata, clazz)) {
        synchronized (this.injectionMetadataCache) {
            metadata = this.injectionMetadataCache.get(cacheKey);
            if (InjectionMetadata.needsRefresh(metadata, clazz)) {
                if (metadata != null) {
                    metadata.clear(pvs);
                }
                //核心
                metadata = buildAutowiringMetadata(clazz);
                this.injectionMetadataCache.put(cacheKey, metadata);
            }
        }
    }
    return metadata;
}
那么如何获取这个元素的?核心方法为buildAutowiringMetadata
private InjectionMetadata buildAutowiringMetadata(final Class<?> clazz) {
    //省略之前
    //找到带有@Autowired注解的属性并封装为AutowiredFieldElement
      ReflectionUtils.doWithLocalFields(targetClass, field -> {
          //核心
         MergedAnnotation<?> ann = findAutowiredAnnotation(field);
         if (ann != null) {
            if (Modifier.isStatic(field.getModifiers())) {
               if (logger.isInfoEnabled()) {
                  logger.info("Autowired annotation is not supported on static fields: " + field);
               }
               return;
            }
            boolean required = determineRequiredStatus(ann);
            currElements.add(new AutowiredFieldElement(field, required));
         }
      });
    //找到带有@Autowired注解的方法并封装为AutowiredMethodElement
      ReflectionUtils.doWithLocalMethods(targetClass, method -> {
         Method bridgedMethod = BridgeMethodResolver.findBridgedMethod(method);
         if (!BridgeMethodResolver.isVisibilityBridgeMethodPair(method, bridgedMethod)) {
            return;
         }
          //核心
         MergedAnnotation<?> ann = findAutowiredAnnotation(bridgedMethod);
         if (ann != null && method.equals(ClassUtils.getMostSpecificMethod(method, clazz))) {
            if (Modifier.isStatic(method.getModifiers())) {
               if (logger.isInfoEnabled()) {
                  logger.info("Autowired annotation is not supported on static methods: " + method);
               }
               return;
            }
            if (method.getParameterCount() == 0) {
               if (logger.isInfoEnabled()) {
                  logger.info("Autowired annotation should only be used on methods with parameters: " +
                        method);
               }
            }
            boolean required = determineRequiredStatus(ann);
            PropertyDescriptor pd = BeanUtils.findPropertyForMethod(bridgedMethod, clazz);
            currElements.add(new AutowiredMethodElement(method, required, pd));
         }
      });

      elements.addAll(0, currElements);
      targetClass = targetClass.getSuperclass();
   }
   while (targetClass != null && targetClass != Object.class);

   return InjectionMetadata.forElements(elements, clazz);
}
而这两个方法中都有一个findAutowiredAnnotation方法,作用是找到带有@Autowired和@Value注解的属性和方法
private MergedAnnotation<?> findAutowiredAnnotation(AccessibleObject ao) {
   MergedAnnotations annotations = MergedAnnotations.from(ao);
   for (Class<? extends Annotation> type : this.autowiredAnnotationTypes) {
      MergedAnnotation<?> annotation = annotations.get(type);
      if (annotation.isPresent()) {
         return annotation;
      }
   }
   return null;
}最后将AutowiredFieldElement和AutowiredMethodElement对象的封装成InjectionMetadata,完成对注解的收集,如果找不到就返回null
疑问四:在拥有收集好注解的集合后,在哪里去使用?
这个问题也可以改为如何进行依赖注入的?
这时候refresh的registerBeanPostProcessors方法也执行完了,然后来执行finishBeanFactoryInitialization
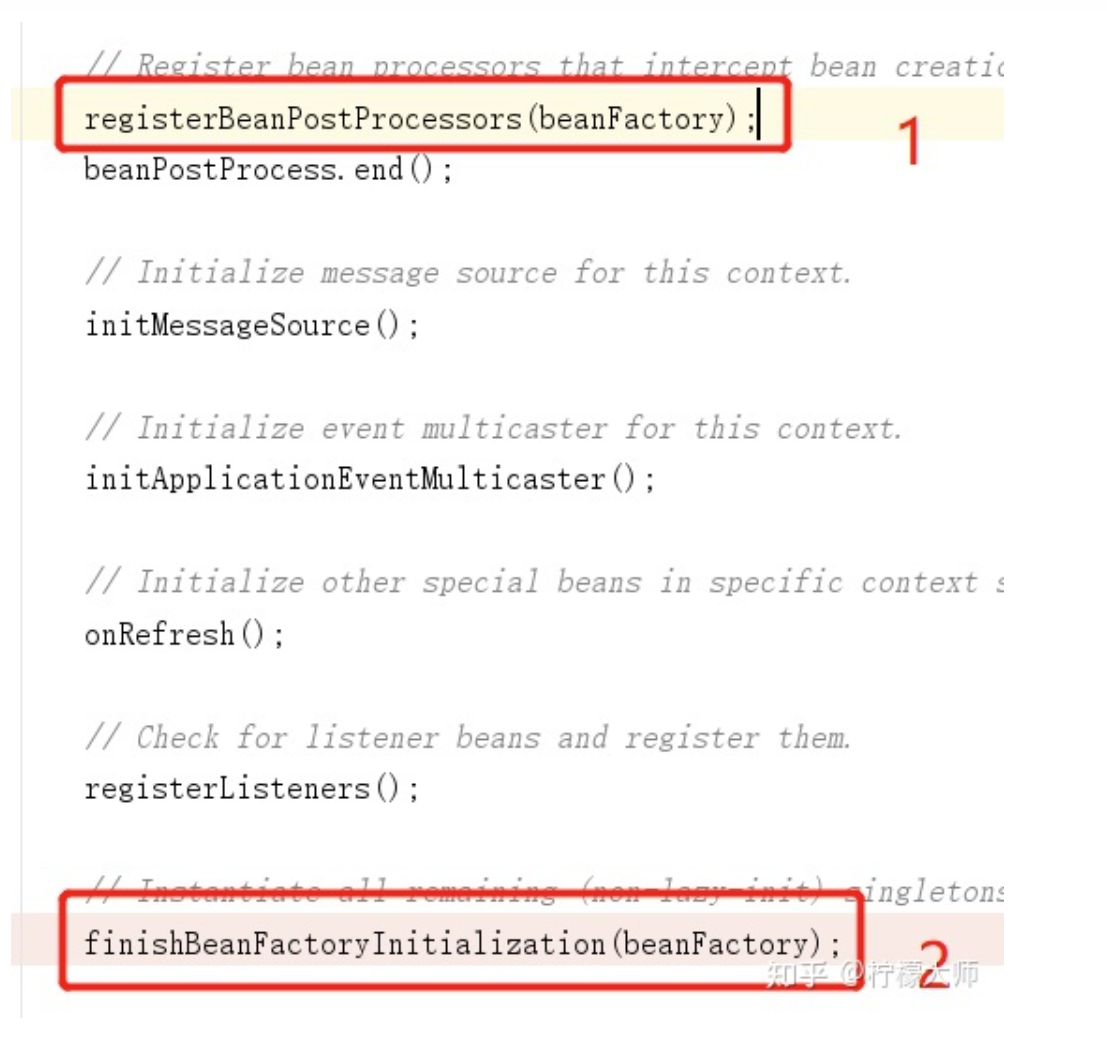
中间一大串调用就不说了,可以自己debug去看,主要说下调用到后置器类的postProcessProperties方法
可以粗略理解为finishBeanFactoryInitialization — > xxxxxxx —-> postProcessProperties
public PropertyValues postProcessProperties(PropertyValues pvs, Object bean, String beanName) {
   InjectionMetadata metadata = findAutowiringMetadata(beanName, bean.getClass(), pvs);
   try {
      //核心
      metadata.inject(bean, beanName, pvs);
   }
   catch (BeanCreationException ex) {
      throw ex;
   }
   catch (Throwable ex) {
      throw new BeanCreationException(beanName, "Injection of autowired dependencies failed", ex);
   }
   return pvs;
}
在点进去,里面有个InjectedElement抽象类,而之前的这两个封装对象也就用到了
public void inject(Object target, @Nullable String beanName, @Nullable PropertyValues pvs) throws Throwable {
   Collection<InjectedElement> checkedElements = this.checkedElements;
   Collection<InjectedElement> elementsToIterate =
         (checkedElements != null ? checkedElements : this.injectedElements);
   if (!elementsToIterate.isEmpty()) {
      for (InjectedElement element : elementsToIterate) {
          //根据不同的元素类型去调用不同的注入方法
         element.inject(target, beanName, pvs);
      }
   }
}
接下来就对应上开头的那段代码了
疑问五:开头的那段代码中的bean时怎么获取的?
因为开头只展示了属性注入了对象,没说这个对象是怎么获取的,获取的方法为resolveFieldValue,这个方法是在属性注入前调用的
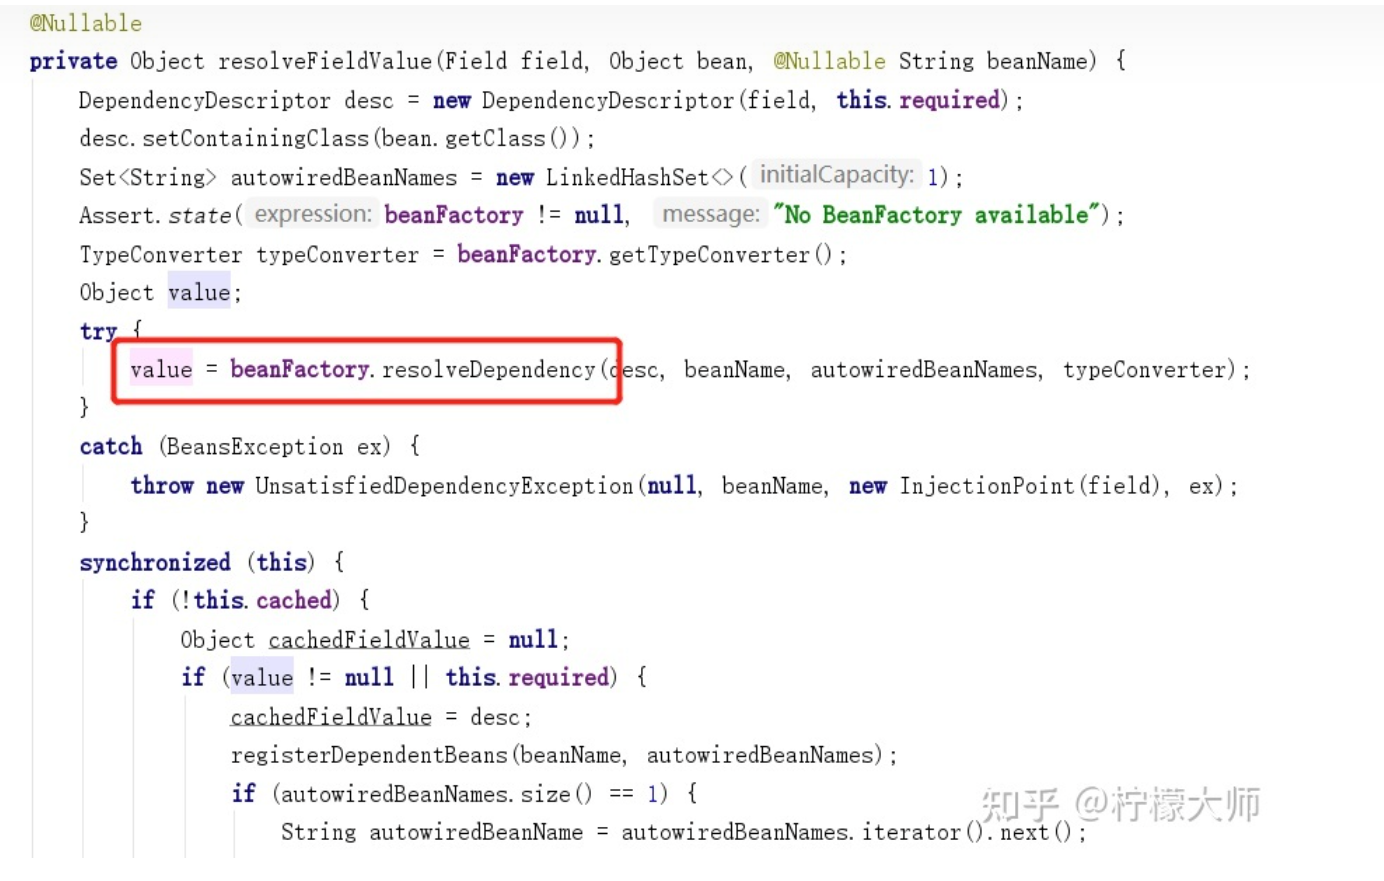
别看方法一大堆,真正有用的就是红框中的那个,其他是缓存的处理
点进去之后一般执行else方法
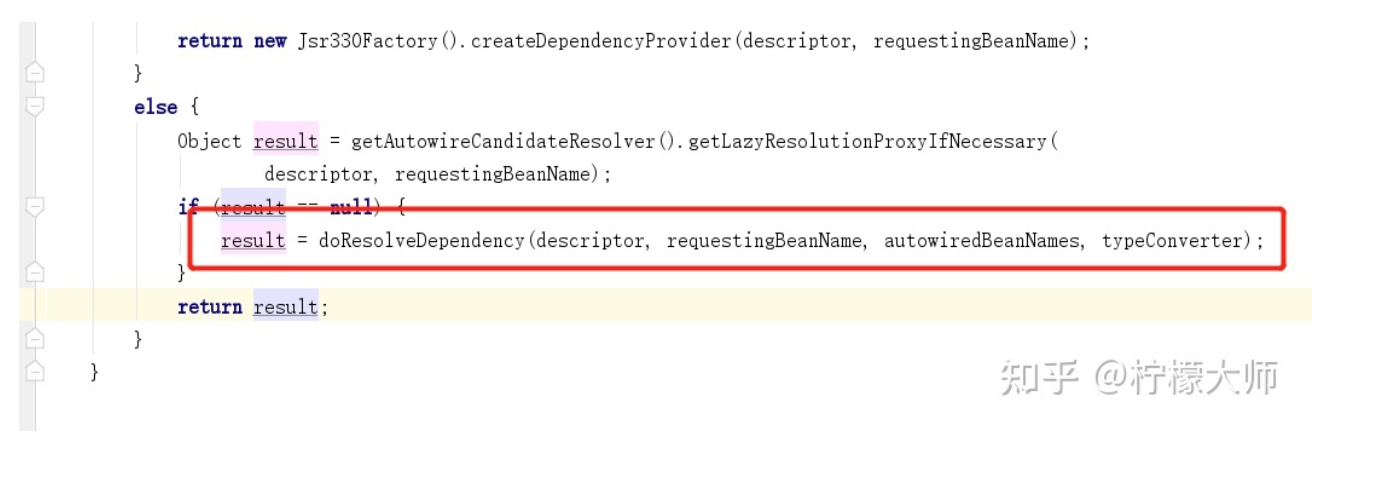
这个方法也是一大堆,主要讲了matchingBeans集合的获取与调用,这个集合存的是依赖对象的所有实现类
@Nullable
    public Object doResolveDependency(DependencyDescriptor descriptor, @Nullable String beanName,
            @Nullable Set<String> autowiredBeanNames, @Nullable TypeConverter typeConverter) throws BeansException {
        //前面省略
    Map<String, Object> matchingBeans = findAutowireCandidates(beanName, type, descriptor);
        //后面省略
}
这里利用获取的map集合进行bean的实例化返回,具体判断规则感兴趣的可以看源码
总结
任何的注解都是三板斧,难点在于如何读取注解并赋予它作用,推荐看springboot的一些注解,它开发利用注解替代了很多的配置文件,可以看看是怎么做到的,看源码实现可以学到很多东西,不过需要一定的内功,比如良好的基础,尤其是对反射这块需要很清楚,还有设计模式也是非常重要的,源码中也有很多地方得到了体现